Help file
1. The top frame asks the user to enter the number of instructions in the loop. By default the value is set to 8.
2. Enter the loop information in the bottom frame.
a. Enter the number of times the loop has to be unrolled. This value is set by default to 2.
b. Enter the assembly code in the table provided in the left hand side of the page.
i. Enter the loop instructions by selecting the instruction opcode and destination and source registers from the drop-down lists. One out of 16 registers can be selected. Selecting blank space for a register field indicates that it does not appear in the instruction.
ii. The immediate value and the branch target should be provided in the “Immediate or Displacement” column.
c. The latencies of different instructions can be entered in the table on the right hand side of the page.
An editor can be used to enter the assembly program by clicking on the “Text Editor” button. This will replace the drop-down list by a text area.
After entering the program, press the submit button to obtain the unrolled loop output.
3. The “Results” page displays the unrolled loop with stalls and the total number of clock cycles required for execution. If the entered loop has loop-carried dependencies, the loop will not be unrolled. A message saying that the loop failed the GCD test will appear. Otherwise, the following information will be displayed.
a. Original loop:
The loop entered by the user is displayed in this section.
b. Unrolled loop
This section displays the unrolled loop. This loop does not have any compiler optimization.
c. Register renaming
Register renaming is done on the unrolled loop to get rid of WAW and WAR hazards.
d. Final scheduled loop
Instruction scheduling is done so as to minimize stalls.
4.
Instructions supported
|
Instruction |
Operation performed
|
Comments |
|
add r1, r2, r3; |
r1 = r2 + r3 |
Addition of operands stored in registers |
|
addi r1, r2, 2; |
r1 = r2 + 2 |
Addition with an immediate operand |
|
sub r1, r2, r3; |
r1 = r2 – r3 |
Subtraction of operands stored in registers |
|
subi r1, r2, 2; |
r1 = r2 – 2 |
Subtraction with an immediate operand |
|
ld r1,10(r2); |
r1 <= Memory[r2 + 10] |
Load register r1 with the contents of memory location [r2
+ 10] |
|
st r1,10(r2); |
r1 => Memory[r2 + 10] |
Store register r1 to the memory location given by [r2 + 10] |
|
beq r1,r2,label; |
if (r1 = r2) go to label |
Branch to label if r1 and r2 are equal |
|
bne r1,r2,label; |
if (r1 != r2) go to label |
Branch to label if r1 and r2 are not equal |
|
bnz r1,label; |
if (r1 != 0) go to label |
Branch to label if r1 is not zero |
|
bez r1,label; |
if (r1 = 0) go to label |
Branch to label if r1 is zero |
The table shows instructions
supported.
5. Rules for entering the loop instructions.
a. By using the Text editor: Every instruction must end with a “;” and every line must have a single instruction. Labels must end with a “:”. Comments are not supported. Registers should be specified in lowercase and should begin with r followed by a number e.g. r1, r2, r3…. Operands appearing in the instruction must be comma “,” separated.
e.g.
Loop: ld
r1,0(r12);
addi r1,r1,1;
st r1,0(r12);
subi r12,r12,1;
bnz
r12,Loop;
b. By using the Drop-down list: Enter the instructions using the following table.
|
Instruction |
Name of fields |
||||
|
Opcode |
Destination |
Soruce#1 |
Source#2 |
Immediate or Displacement |
|
|
add r1, r2, r3; |
add |
r1 |
r2 |
r3 |
Blank |
|
addi r1, r2, 2; |
addi |
r1 |
r2 |
Blank |
2 |
|
sub r1, r2, r3; |
sub |
r1 |
r2 |
r3 |
Blank |
|
subi r1, r2, 2; |
subi |
r1 |
r2 |
Blank |
2 |
|
ld r1,10(r2); |
ld |
r1 |
r2 |
Blank |
10 |
|
st r1,10(r2); |
st |
Blank |
r1 |
r2 |
10 |
|
beq r1,r2,label; |
beq |
Blank |
r1 |
r2 |
Targ. instr. num. |
|
bne r1,r2,label; |
bne |
Blank |
r1 |
r2 |
Targ. instr. num. |
|
bnz r1,label; |
bnz |
Blank |
r1 |
Blank |
Targ. instr. num. |
|
bez r1,label; |
bez |
Blank |
r1 |
Blank |
Targ. instr. num. |
The table shows the rules of entering
instructions using drop down list.
(Here “Targ. instr.
num.” is the instruction number of the branch target instruction.)
(NOTE:
It should be noted that branch instructions cannot appear in the loop body
except for the last position. Moreover, there shouldn’t be any instructions
before or after the loop body.)
6. Scheduling algorithm: List Scheduling algorithm is used for instruction scheduling of the unrolled loop after register renaming. This involves the following steps.
1. A dependency graph is formed for instruction in the loop body. The nodes represent instructions and the edges represent the dependency between two instructions. The weight on the edges is the latency of the instruction.
e.g.
Consider the following loop after the register renaming operation is done. Corresponding dependency graph is shown in the figure below.
|
Instruction Number |
|
Latency |
|
|
1 |
|
ld r1,0(r12); |
2 |
|
2 |
|
addi r1,r1,1; |
1 |
|
3 |
|
st r1,0(r12); |
0 |
|
4 |
|
ld r2,1(r12); |
2 |
|
5 |
|
addi r2,r2,1; |
1 |
|
6 |
|
st r2,1(r12); |
0 |
|
7 |
|
addi r12,r12,1; |
1 |
|
8 |
|
subi r10,r10,1 |
1 |
|
9 |
|
bnz r10, |
0 |
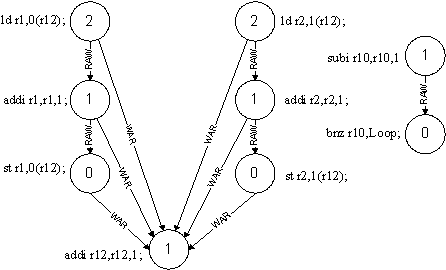
The figure shows dependency graph of the loop given in the above table.
(In the figure, the number in the circle represents the latency of the instruction and the arrows are annotated with the type of hazard between the instructions.)
2. The dependency graph is scheduled using the List Scheduling algorithm explained in the flow chart below.
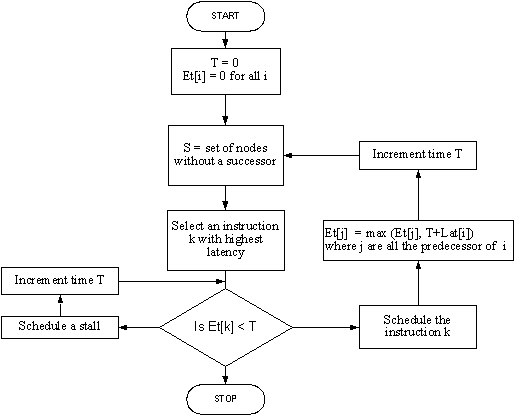
The figure shows flow chart for the scheduling algorithm.
Where:
Et[i] : Earliest time
instruction i can be scheduled
S
: Set of node without any successor
T
: Current time
Lat[i] : The latency of ith
instruction
The dependency
graph is topologically sorted and a set of instructions, for which the input
dependencies are resolved, is formed.
The instructions generating the input operands are already scheduled for
the members of the set. The instruction
having maximum latency is greedily selected from the set. This instruction is
scheduled at the present time, if all its predecessors have finished their
execution. Otherwise, a stall is
scheduled.
This
algorithm does not necessarily give the optimum schedule. Consider the following code segment.
|
Instruction Number |
Instructions |
|
1 |
ld
r1,0(r12); |
|
2 |
subi r2,r2,1; |
|
|
STALL |
|
3 |
add
r3, r3,r2; |
|
4 |
subi r4,r2,1; |
|
|
STALL |
|
5 |
add
r3,r3,r4; |
|
6 |
subi r12,r12,1 |
|
7 |
add
r1,r1,r4; |
Total
number of cycles = 9
Original code
Assume that load instruction has a latency of 2 clock cycles while all other have a latency of 1 clock cycle.
In the first iteration the set S = {1,2,4,6}
The algorithm will select 1 (ld r1,0(r12);) as it has the highest latency among the elements of S. It will give the following schedule, which is suboptimal.
|
Instruction Number |
Instructions |
|
1 |
ld
r1,0(r12); |
|
2 |
subi r2,r2,1; |
|
6 |
subi r12,r12,1; |
|
3 |
add
r3, r3,r2; |
|
4 |
subi r4,r2,1; |
|
|
STALL |
|
5 |
add
r3,r3,r4; |
|
7 |
add
r1,r1,r4; |
Total
number of cycles = 8
Suboptimum solution obtained from list scheduling
The optimum solution is obtained by putting load after subtract instruction as shown below.
|
Instruction Number |
Instructions |
|
2 |
subi r2,r2,1; |
|
1 |
ld
r1,0(r12); |
|
3 |
add
r3, r3,r2; |
|
4 |
subi r4,r2,1; |
|
6 |
subi r12,r12,1; |
|
5 |
add
r3,r3,r4; |
|
7 |
add
r1,r1,r4; |
Total number of cycles = 7
Optimal solution
References:
1)
Computer Architecture, A Quantitative Approach, 2nd
Edition John L. Hennessy and David A. Patterson
Morgan Kaufmann Publishers, 1996
2) http://cs.haifa.ac.il/courses/compilers.old/SemesterB2002/ListSchedualingExample.pdf for list scheduling